
In today’s fast-paced development environments, efficiency is paramount. Teams are continually seeking ways to streamline processes, reduce manual tasks, and ensure consistent workflows. And this definitely something we should be all doing! 🙂
Enter Jira Automation—a powerful feature within Atlassian’s Jira platform that empowers teams to automate repetitive tasks, enforce business rules, and enhance overall productivity. This article dives a bit deeper into the essentials of Jira Automation, guiding you on how to get started and highlighting best practices to maximize its potential.
Understanding Jira Automation
Jira Automation allows teams to automate their processes and workflows without the need for custom scripts or add-ons. With its intuitive, no-code rule builder, users can create automation rules that range from simple tasks, like assigning issues, to complex scenarios involving multiple conditions and actions.And it is fairly easy, believe us!
Key Components of Automation Rules
Every automation rule in Jira comprises three fundamental components:
- Triggers: These are events that initiate the execution of a rule. Triggers can be based on various actions within Jira, such as the creation of an issue, a status change, or even a scheduled time.
- Conditions: Once a rule is triggered, conditions determine whether the subsequent actions should proceed. They act as filters, ensuring that actions are executed only when specific criteria are met. For example, a condition might check if an issue is of high priority before escalating it.
- Actions: These are the tasks performed when a rule runs. Actions can include updating issue fields, sending notifications, creating sub-tasks, and more.

By combining these components, teams can tailor automation rules to fit their unique workflows and requirements.
Getting Started with Jira Automation
Embarking on your automation journey in Jira is straightforward. Here’s a step-by-step guide to help you begin
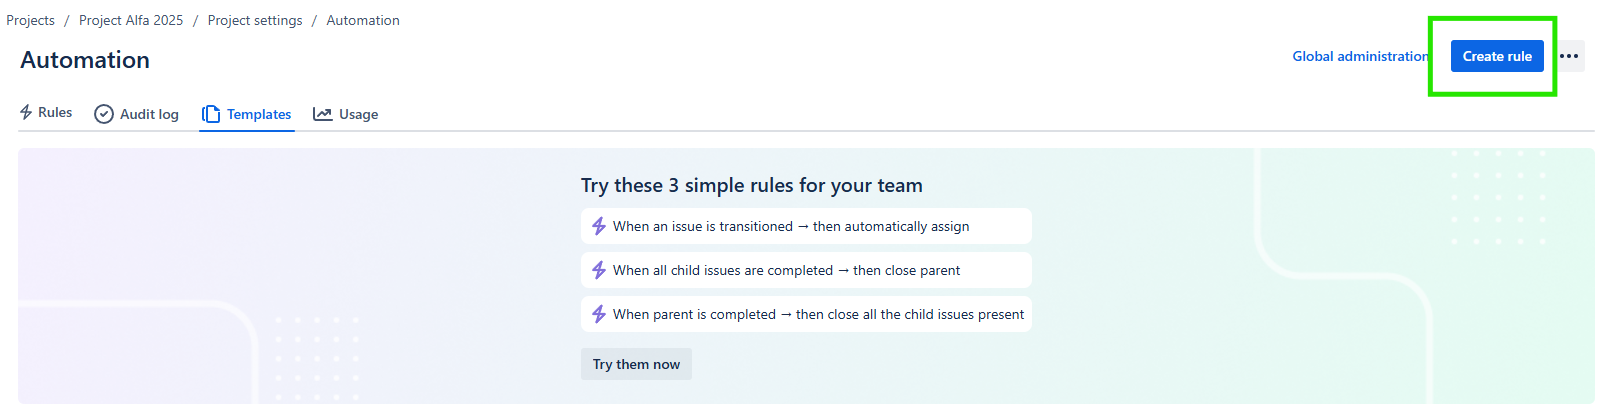
1. Access the Automation Settings
Navigate to your Jira project’s settings and select the “Automation” option. This section is the hub where you can create, manage, and monitor your automation rules.

2. Create a New Rule
Click on “Create rule” to initiate the rule creation process. You’ll be prompted to select a trigger that will kick off your rule.
3. Define the Trigger
Choose an appropriate trigger based on your desired automation. For instance, if you want a rule to run whenever an issue is transitioned to “In Progress,” select the corresponding trigger.

4. Set Conditions (Optional)
Add conditions to refine when your rule should execute. For example, you might want the rule to apply only to issues of a certain type or priority.

5. Specify Actions
Determine the actions that should occur when the rule runs. This could involve updating fields, sending alerts, or transitioning issues.

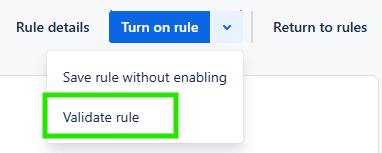
6. Test Your Rule
Before deploying your rule in a live environment, it’s crucial to test it to ensure it behaves as intended. Jira provides a “Manual trigger” feature that allows you to execute rules on-demand for testing purposes.
7. Activate the Rule
Once satisfied with your rule’s configuration and performance during testing, activate it to start automating your workflows.

Best Practices for Implementing Automation Rules
To harness the full potential of Jira Automation, consider the following best practices:
1. Start Simple
Begin with straightforward automation rules to familiarize yourself with the interface and functionalities. As you gain confidence, progressively implement more complex automations. Also, check what is available directly in Jira like mini guides and ready-to-use examples.
2. Use Descriptive Naming Conventions
Assign clear and descriptive names to your rules. This practice ensures that team members can easily understand the purpose of each rule, facilitating collaboration and maintenance.
![]()
3. Leverage Conditions Wisely
Incorporate conditions to prevent unintended actions. By setting precise criteria, you ensure that rules execute only under appropriate circumstances, thereby maintaining data integrity.
4. Monitor and Review
Regularly review the performance of your automation rules. Jira’s audit logs provide insights into rule executions, helping you identify and address any issues promptly.
5. Test in a Safe Environment
It’s advisable to test your automation rules in a non-production environment, such as a sandbox or test project. This approach minimizes the risk of disrupting live operations.
Testing Automation Rules: A Crucial Step
One of the standout features of Jira Automation is the ability to test rules before fully implementing them. This functionality ensures that your automations function as intended without impacting your production environment.
Utilizing the Manual Trigger for Testing
Jira’s “Manual trigger” allows you to execute automation rules on-demand, facilitating thorough testing. Here’s how to use it:
- Create or Edit a Rule: While configuring your rule, select the “Manual trigger” as the initiation event. This setup enables manual execution of the rule.
- Save the Rule: After configuring the necessary conditions and actions, save your rule.
- Execute the Rule: Navigate to an issue that meets your rule’s criteria. From the issue’s detail view, select the “Actions” dropdown menu and choose your rule from the list. The rule will execute immediately, allowing you to observe its behavior.
This testing method provides a controlled environment to validate your automation logic, ensuring it performs as expected before broader application.
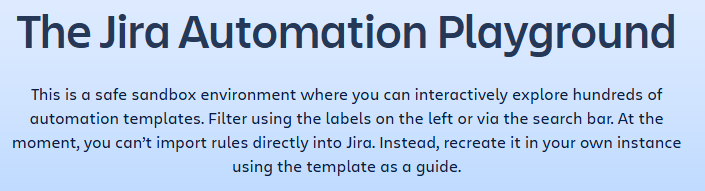
Now the best part… Exploring the Automation Playground
Atlassian offers an “Automation Playground,” a safe sandbox environment where you can interactively explore hundreds of automation templates. This resource allows you to experiment with various automation scenarios without affecting your live projects. While direct import of rules from the playground into your Jira instance isn’t available, you can recreate desired automations based on the templates provided.
Conclusion
Jira Automation is a game-changer for teams looking to streamline workflows, reduce manual effort, and ensure consistency in their processes. With its intuitive, no-code rule builder, even non-technical users can create powerful automation rules to enhance productivity. By leveraging triggers, conditions, and actions, you can tailor Jira Automation to fit your specific project needs.
One of the most critical aspects of implementing automation is testing before deployment. Atlassian provides useful tools, such as the Manual Trigger and the Automation Playground, to ensure that your rules function correctly without disrupting production environments. Taking advantage of these features helps you refine your automation setup and avoid unintended consequences.
By following best practices—starting simple, naming rules descriptively, using conditions effectively, and regularly monitoring automation performance—you can maximize the benefits of Jira Automation. Whether you are automating issue assignments, escalating high-priority tasks, or integrating with external tools, Jira Automation offers endless possibilities to optimize your workflows.
Start experimenting with automation in Jira today and take your project management efficiency to the next level! 🚀